Service
Contact
Service times
Mo - Fr: 9:00 - 18:00
Sa: 9:00 - 14:00
Select delivery country
We just need your E-Mail and shipping address.
Feel free to add more samples to your sample cart afterwards.
planeo is the brand for professional solutions with tested quality. In our extensive range, you will find first-class products for home and garden, from floors to wall coverings to decking: we offer you suitable items with a top price-performance ratio for almost every requirement and budget. We also have product lines such as carpets, wall paints, wallpapers and doors. The range of attractive offers for walls, floors and patios is rounded out by high-quality accessories and effective cleaning and maintenance products. Meanwhile, planeo's services go beyond the trade in floor coverings. We put great emphasis on the idea of service in everything we do. We deal with the topics of material, handling and realisation in such detail that we can provide you with an adequate solution for many different situations on the building site. To make things more clear, you can find useful tips and instructions in our guides with articles and videos. Beautiful flooring and more? Realise easily with planeo.
| item no. | ptkall21L-R16 |
|---|---|
| Collection | Lack 2.0 |
| Colour | white |
| Deck board | HDF-Platte |
| Doorstop | door right |
| EAN | 4062212102701 |
| Edge | Round |
| Floor seal | ohne Bodendichtung |
| Frame | MDF |
| Hinge | 3-teilig (Robust) |
| Join | DIN 25,5x13 mm |
| Lacquer structure | 3-Schicht-Spritzlackaufbau |
| Lacquer | Surface | White lacquer 9016 |
| Length in mm | 2110 |
| Light cut-out | ohne LA |
| Lock | BB - multicoloured beard |
| Lock faceplate | Stulp 20mm silberfarbig |
| Look | solid colour |
| Manufacturer | planeo |
| Middle position | Röhrenspanplatte |
| Piece per package | 1 |
| Shipping group | L |
| Style | Modern |
| Thickness in mm | 40 |
| Type | Interior door |
| Weight | 28,84 kg/Packing |
| Width in mm | 860 |
| Package Content | 1 Pc |
|
Show all data ▼
|
|
| Downloads | |
|
|
|
We will help you with your questions!
A specialist adviser will be happy
to advise you personally.
Variant: DIY instructions
 button
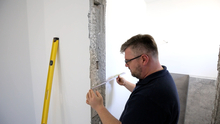
The first step is to acquire accurate measurements in order to order the correct door. Check the wall's level using a spirit level. Begin by determining the height from the floor. Then, in the finished state (with plaster and covering), measure the wall thickness at three points: top, middle, and bottom. Apply the same logic to the other side. Finally, the width of the door is measured at all three places. Determine the door hinge once the measurements have been determined and noted.
ATTENTION: If the floor has not yet been constructed, add the construction height of the floor to the measurement to ensure that the door is the correct height. When measuring the breadth, the width of the tiles on the wall is also considered.
 button
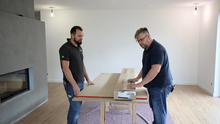
The door and all other components should be stored horizontally in the packs in the room where they will be assembled for at least 48 hours before assembly. This allows the material to adjust to ambient temperature and reduces the amount of "labour" required after installing. Before processing, arrange the components. Open the packages carefully so that the cutter knife does not damage the door/frame.
Before laying, the official assembly instructions provided in each item must be followed, or any warranty and guarantee claims will be null and invalid!
 button
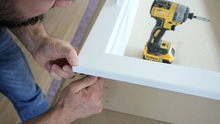
To assemble the frame together, first glue and screw the various pieces together. Connect the two frame components by placing the wooden plates into the joints after applying adhesive to the mitred surfaces of the longitudinal and transverse linings. Insert the connector into the hole in the frame and tighten it with a screwdriver. Metal clips are then used to secure the elements. A wet cloth can be used to remove excess glue. This is then done on the opposite side. The structure is then installed around 3 mm above the floor to protect it from moisture (e.g. cleaning water). As soon as it is in position, use a frame clamp to align it and foam it using 2-component foam. The clamps can be removed after curing. The ornamental cladding is now fixed and in place.
Tip: As an alternative to the clamps, you can also work with wedges and wooden slats.
 button
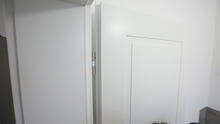
You can hang the door after installing the frame and ornamental panel and inserting the hinges. Install the hinges. Remove the door's storage feet and hang it on the hinges provided.
 button
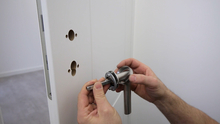
The door handles are finally installed. Drill holes for the door handles using the provided drilling pattern. On both sides, drill a rough fray. The fittings are then carefully inserted and assembled. Finally, insert the plunger and install the ornamental panel.
To make your own, you will need this
Material:
Tools:
Are you looking for a lower price? Just ask us for an individual offer!
 button
  button
  button
  button