WPC Fence Installation Made Easy

10.04.2024
Designing one's own garden is a fulfilling project for many DIY enthusiasts. An essential part of this often involves erecting a garden fence. It not only creates privacy and a physical barrier but also significantly contributes to the appearance of the outdoor area. Therefore, the choice of fence increasingly falls on WPC (Wood-Plastic Composite). This innovative material blend combines the aesthetics of wood with the durability and low maintenance of plastic. Moreover, the clever interlocking systems make WPC fence installation simple, enabling even those without much experience to undertake the construction themselves. In the following guide, we will explain in detail how to plan your WPC fence, what materials and tools you will need, and how to proceed with the installation.
Content
Step-by-Step Guide: Building Your Own WPC Fence
With careful planning, the right tools, a WPC system from planeo, and a bit of craftsmanship, WPC fence building is not rocket science. This guide will take you through the individual steps. Another tip before you start: Take plenty of time, then nothing will stand in the way of a high-quality final result.
1. Gather and Prepare Tools and Materials
Creating an optimal foundation for a hassle-free WPC fence installation begins with laying out all the necessary tools and materials before starting work. What you need in detail naturally always depends on the type of fence and the local conditions. However, the following checklist provides you with a guideline on what you should have ready for fence construction.
Tools
- Spade for the foundations
- Wooden slats for alignment
- Water bucket or tub
- Tape measure and folding ruler
- Clamps
- Mason's string
- Cordless drill
- Spirit level
- Rubber mallet
- Marking spray (optional)
Materials
- WPC fence including fence posts and fence panels
- Quick-dry concrete and water for the foundation
- Wall connection profile (optional)
2. Determine the Course of Your WPC Fence
Consider in advance exactly how you want your WPC fence to run in your garden. Is it replacing an existing fence? In this case, you can orient yourself by its course. Otherwise, you are free in your design. For example, do you want to integrate an existing hedge into your fence? Then spare it accordingly and start planning your fence course next to it. Regardless of how you design the course, always ensure to maintain at least 50 cm distance from the property line. This way, you avoid unnecessary trouble with neighbours and authorities.
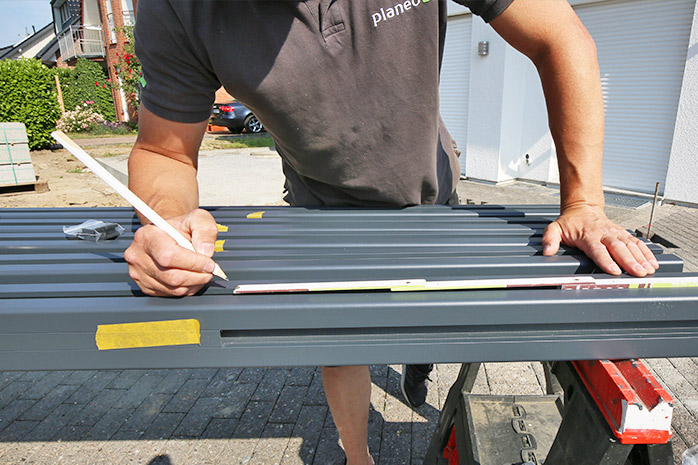
3. Measure the WPC Fence and Mark Posts
Before starting the installation of your WPC garden fence, you need to measure where the fence posts will later stand. The distance between the individual fence posts results from the width of the fence panels (e.g., 180 cm). Consider that there should always be 5 millimetres of clearance between the panels and the posts. This allows you to later slide the fence elements into the guide rails without any problems.
Now mark the hole for the first post and then measure the distance from the centre of the mark to the next post. You can also drive wooden wedges or metal rods into the ground at these points and stretch a mason's string between them. This way, you can easily trace the later course of your WPC fence and make adjustments if necessary.
4. Dig Holes, Insert Fence Posts, and Concrete
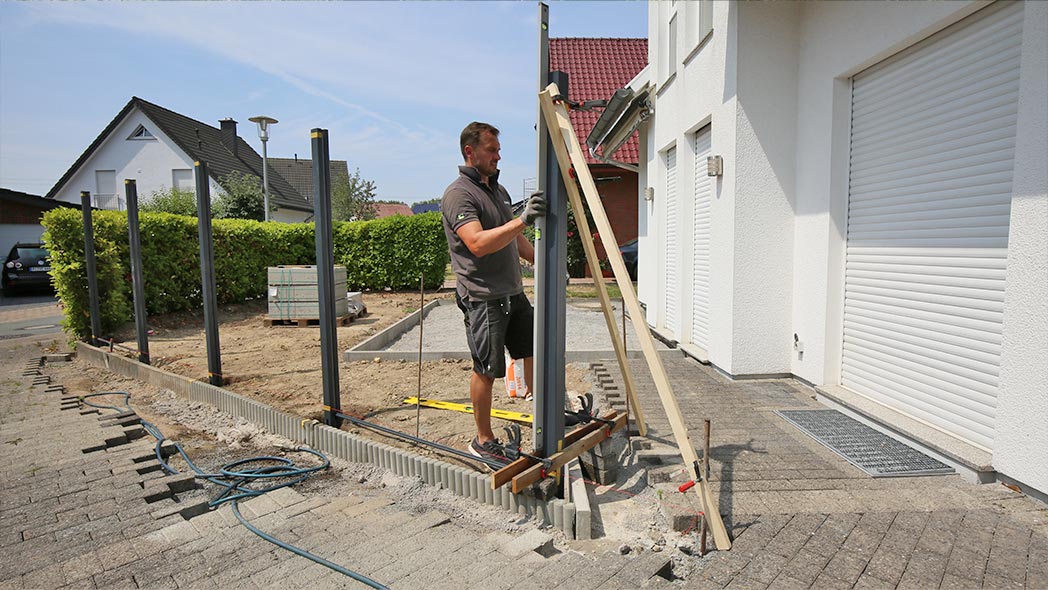
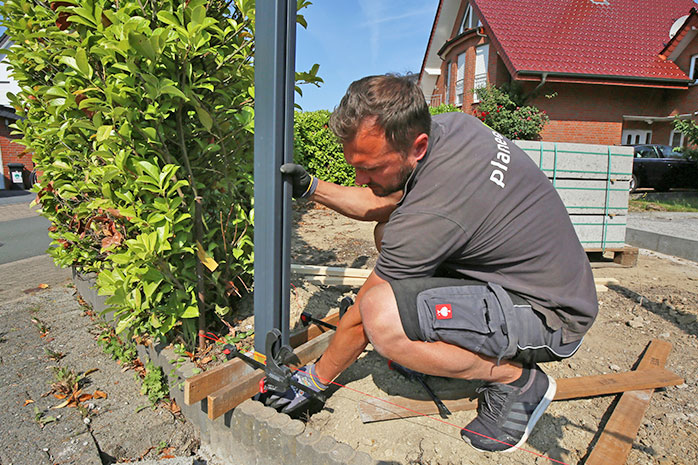
Now start with your spade, digging the holes for the foundations of the posts. Each post hole should be 30 x 30 cm wide and at least 80 cm deep. With this depth, you ensure that the foundation of your WPC fence is below the so-called frost line, preventing damage in winter. Moreover, this gives your fence optimal stability.
Once you have dug the holes, you can begin setting the fence posts. Position the posts in the centre of the holes and align them using a spirit level. Once the posts are level, you can fix them in place using wooden slats, metal rods, and clamps. If all fence posts are aligned and securely in place, you can begin concreting. Quick-dry concrete from the hardware store is best suited for this. Pour the concrete dry into the excavated hole and then douse it with the amount of water specified on the packaging.
Important: Always pay close attention to the manufacturer's instructions when processing the concrete. While some quick-dry concretes (as in our example) do not need to be pre-mixed with water, others do. Therefore, read the exact instructions before concreting to ensure the durability of the foundation later.
For a foundation of 30 x 30 x 80 cm, you will need about 5 to 6 bags of 25 kg quick-dry concrete each. However, the exact quantity may vary from product to product. Proceed step by step when filling the hole with concrete. So, pour one bag of concrete into the hole and then douse it with water. Wait until it has completely absorbed the water before adding the second bag to the hole. Continue this alternating process until the hole is filled with concrete. Tip: Leave a few centimetres of air at the end. This way, you can later cover the foundation with soil or bark mulch.
Depending on the quick-dry concrete used, the foundation of your WPC fence will be load-bearing after one to three hours. After 24 hours, the concrete is fully cured, so you can remove the support slats and proceed with mounting the WPC fence.
Alternatively: Dowel Fence Posts onto Existing Foundation or Terrace
If you already have foundations from a previous fence that you can reuse, or if you want to mount your WPC fence on a terrace, the time-consuming digging and concreting are unnecessary, and you can start mounting the posts right away. Use suitable brackets for the fence posts. You can order suitable mounting solutions directly with your WPC fence from our range. Drill appropriate holes in the concrete, insert dowels, and attach the brackets with rust-resistant screws. Then you can mount the aluminium posts and continue with the WPC fence installation.
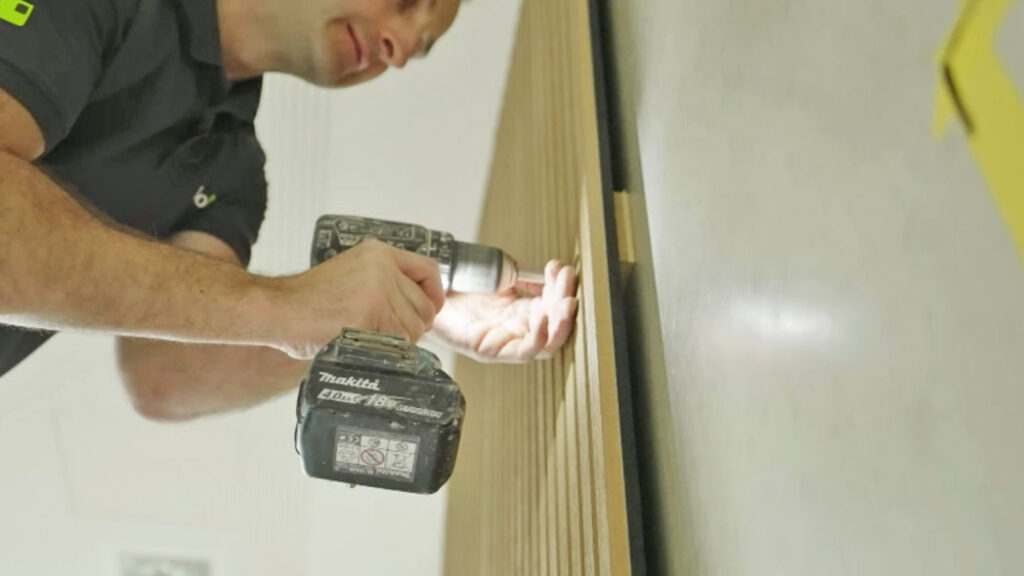
5. Mount WPC Panels
The final step in WPC fence installation involves attaching the panels. This is quite simple since the fence posts each have guide rails into which you can easily insert the panels. Always start with the end strip. It forms the clean finish of your WPC fence at the bottom and also serves as additional protection for the WPC slats. Now you can gradually insert the individual panels into the guide rails. Attention: Make sure to insert the panels correctly (tongue into groove). Only then will the individual elements form a unit and hold together optimally.
To further increase the stability of your WPC fence, insert a stabilisation strip on every third slat from the side. These metal rods are included in the sets from planeo and increase the resilience of your garden fence or privacy screen. Finally, apply a dab of silicone to the end caps on the posts and attach the end profile to the last row of slats. This provides a visually clean finish and gives your WPC fence the necessary support.
Frequently Asked Questions About WPC Fences and Their Installation
If you are considering buying a WPC fence and having it installed by a professional, you are likely interested in the costs involved in installation by a company. An answer to this and other questions, for example, whether WPC or BPC is better for fences or what to consider when installing a fence on a slope,can be found in our FAQ.
How do I install a WPC fence on a slope?
Installing a WPC fence is also possible on sloping terrain. In this case, however, you need to compensate for the slope over the length of the fence. You have two options for mounting the fence on a slope: You can excavate the ground in steps and install the WPC fence stepwise. Height differences of up to 5 cm between two adjacent, equally high fence sections are easily compensable. You can install the WPC fence so that its upper edge runs flush, and fill in the individual elements at the bottom with WPC fence slats. Which option is most suitable for you depends on the degree of the slope and the length of the fence. Since installing a WPC fence on a slope can be more challenging, we recommend seeking assistance from an experienced professional if you are unsure.
What does a privacy fence cost with installation?
The costs for a privacy fence primarily depend on the material. For a WPC fence, depending on the quality and design, the prices are roughly between 150 and 250 Euros per running meter. If you prefer not to install the WPC fence yourself but to have it erected by a fence professional, additional costs will incur. These can vary significantly depending on the provider and the specific requirements of your project, as well as factors such as soil condition and the region in which you live. However, some companies offer WPC fence installation starting from 50 Euros per meter. This value is only for orientation. We recommend obtaining several offers from different providers. This way, you can compare the costs for your privacy fence including installation and decide on the best offer.
Which is better: WPC or BPC fence?
This cannot be answered across the board, as the suitability of the two materials depends on the specific application. In general, BPC (Bamboo-Plastic Composite) is considered a more environmentally friendly solution because, unlike the wood fibres used in WPC, it contains fast-growing bamboo grass. Also, boards made of BPC are harder than those made of WPC, making fences from this material especially suitable for areas with high traffic or adverse weather conditions. In terms of maintenance, WPC and BPC are very similar. Both can be easily cleaned with water and do not require painting. When it comes to resistance to pests and fungal attack, WPC has the edge. The choice between the two materials, therefore, largely depends on the specific requirements of your project. Both WPC and BPC offer an attractive, low-maintenance, and durable solution for building garden and privacy fences.
Conclusion: WPC Fence Installation is Feasible for DIY Enthusiasts
WPC fences are a good choice if you are looking for a durable, low-maintenance, and robust fence. With some craftsmanship, the right tools, and the necessary materials, you can carry out the installation yourself. The foundation for a successful installation is careful planning. This includes determining the course of the fence and accurately measuring and marking the post holes. Following this are the digging of the holes, pouring the foundations with quick-dry concrete, aligning the fence posts, and inserting the panels. For experienced DIY enthusiasts, these tasks should not pose a problem. However, if the WPC fence is to be erected on a slope, the installation may be somewhat more challenging. In this case, it is advisable to seek assistance from an experienced professional and have the fence installed. The costs for this depend on the local conditions, the provider, and the desired fence.
Key Points at a Glance:
- Use high-quality materials to increase the lifespan of your fence.
- Follow the installation instructions carefully to achieve a clean and secure fence.
- For complex tasks, such as erecting on a slope, enlist a professional.
Experience the best service with planeo - because you need it!
No matter what challenges you face with your project, planeo provides you with the right solution. Benefit from the advantages of our services:
- Free samples⁴ - for many of our garden fence products: Order up to 5 samples at no cost, for example, from our WPC fences.
- Free storage³ - for several months and delivery on the date of your choice.
- Expert advice¹ - We offer professional consultation through our contact page or answer your questions directly in the comments.