Adhesive vinyl flooring - 4 ways to install adhesive vinyl

02.05.2023
Gluing vinyl flooring is the standard installation method for design flooring. First of all, this means laying adhesive vinyl over the entire surface of the wet bed. This is how professional installers have been doing it for decades. But the classic method of gluing vinyl flooring is also suitable for the dedicated hobby floor layer. If you are not confident with this installation method, there are other options for gluing vinyl flooring. You can also dry glue vinyl planks in different variants. This makes the installation process much easier. Because all the components for gluing vinyl flooring are already defined here. Therefore, we’ll show you the best alternatives to the usual vinyl floor gluing.
Content
In this guide to gluing vinyl flooring, the following questions will be answered:
- Which way can you glue down vinyl flooring?
- What are the advantages and disadvantages of the different ways of gluing vinyl?
- How can a layman professionally glue down vinyl flooring [Watch our installation videos]?
- When is gluing vinyl more sensible than clicking?
- The most common mistakes when gluing vinyl flooring - how do I avoid them?
You can also contact us at any time with questions about gluing vinyl flooring or leave a comment at the end of the article.
<<Call us on +495222 960480 or contact us directly: info@planeo.de>>
Gluing vinyl flooring - which gluing method is better?
You can glue vinyl flooring in different ways. Which is the best way for you to glue down vinyl flooring? Here we list the most common ways of gluing vinyl flooring. This brief overview will help you to assess the different options for yourself in advance:
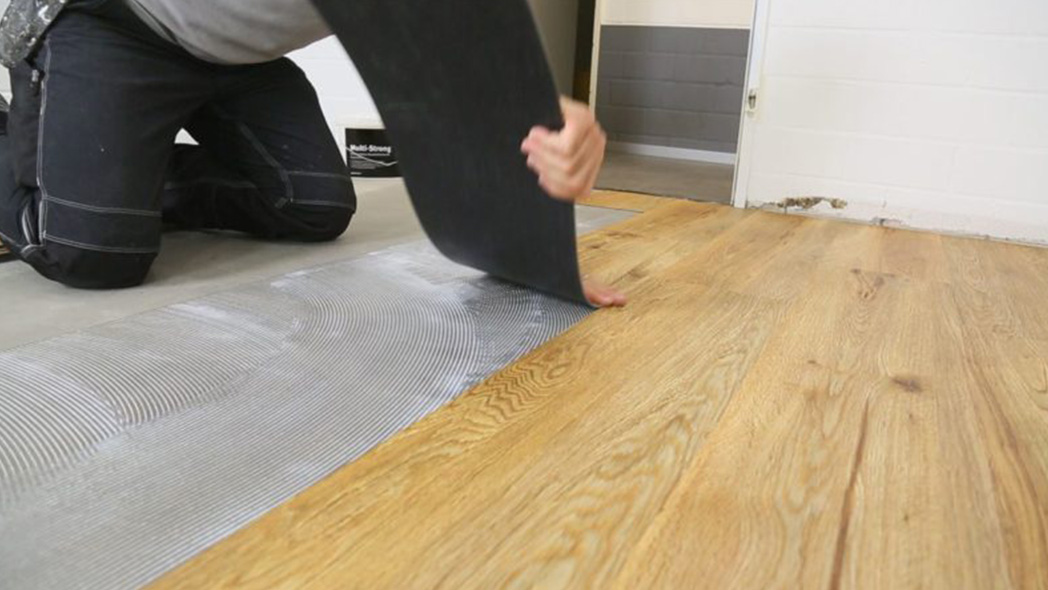
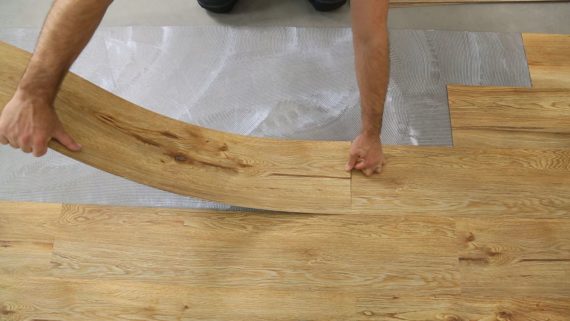
- Glue vinyl flooring into the wet bed in the classical way. Apply vinyl adhesive with a notched trowel to the previously smoothed subfloor and glue the planks in place.
- Floating vinyl flooring on insulation. You stick vinyl onto the special insulation mat silent stick with integrated dry adhesive. Only the adhesive vinyl and the insulation bond. Therefore, the planks are also floating, as with click vinyl.
- Self-adhesive installation of vinyl flooring. Here, the dry adhesive is already present on the back of the vinyl plank. This means that the planks adhere virtually by themselves to a suitable subfloor.
- Lay vinyl planks on a double-sided adhesive film. A special film serves here as a bonding guide between the substrate and the vinyl covering. First, stick the film to the subfloor and in the second step, stick the vinyl planks to the adhesive film.
Below you can get more familiar with the 4 methods of gluing vinyl mentioned above.[1] We will highlight the disadvantages of gluing vinyl flooring as well as the advantages. Find the best method of gluing vinyl flooring for you!
1. Vinyl floor gluing - the advantages and disadvantages of wet bed gluing
Elastic design coverings or vinyl planks - also called adhesive vinyl - are used for professional bonding with wet-bed adhesive. This classic adhesive variant is not only convincing for professionals or the contract department. Because gluing creates a very firm bond between the floor and the subfloor.
This has several advantages. However, gluing vinyl flooring has some disadvantages when installing it the classical way.
9 Advantages of vinyl flooring classically glued into the wet bed:
- A firm connection with the subfloor is ideal for acoustics. Because there are no hollow-sounding rattling noises when walking on them. The glued vinyl planks transfer the walking noise into the "mass" of screed. The way the vinyl is glued reduces the walking noise to a minimum.
- Bonding with wet bed adhesive is also suitable for high-pressure loads on vinyl: The thicker the structure and the softer the subfloor, the more likely it is that pressure marks arise. Glued vinyl flooring, on the other hand, tolerates high loads much better.
- Especially in the contract sector, heavy furniture or furnishings - such as shop counters - are often used. You would have to lay click floors around the heavy furnishings in an elaborate way. Like in a kitchen, where you first build the kitchen unit and then lay the floor right up to the furniture. If, on the other hand, you glue vinyl, you can lay vinyl flooring all over the rooms, regardless of the subsequent furnishings.
- Starting with a ready-to-lay surface, classic vinyl gluing is usually more cost-effective than clicking. You simply save on labour and material costs.
- When you glue vinyl, you get the smallest possible installation height. Especially with specified elements such as glass doors, a few millimetres of height can make all the difference. With vinyl flooring, an extremely low installation height of 2 mm for the vinyl floor plus 1 mm for the adhesive is possible.
- The vinyl planks can be replaced individually. Because local damage to the vinyl floor can be renovated with little effort. This makes adhesive vinyl flooring quick and inexpensive to repair. An unbeatable advantage over floors from the click area.
- As long as you do not find an expansion joint in the subfloor, you can lay adhesive vinyl endlessly. Since there are no rails or similar, you benefit in two ways: firstly, you have a continuous surface without any visually disturbing interruptions. And secondly, there are no trip hazards like rails. This is why vinyl floor adhesion is particularly suitable for barrier-free usable areas such as in retirement homes. This means that large areas of vinyl flooring can be glued down without any trip hazards, which is ideal, especially in busy properties and commercial areas.
- Underfloor heating is a challenge for many floor coverings because of the temperature fluctuations. They must be dimensionally stable and have good thermal conductivity values. Adhesive vinyl is an ideal case here for underfloor heating because of its very good thermal conductivity. While in the click area, the thermal performance of vinyl is not much worse, you achieve the optimum with adhesive vinyl. This is also shown in comparison in the following table:
Vinyl on underfloor heating - comparison gluing and clicking

- Material expansion is limited despite solar radiation. Large window areas receive a lot of sun without shading. The vinyl floor must then cope with strong heating during the day. Dark vinyl floors heat up more than light ones. This is where glued vinyl flooring again plays to one of its strengths. Since each plank is glued individually, it can only expand to a very limited extent. This is why adhesive vinyl does not ripple even when heat is generated.
If you consider the disadvantages of classic vinyl gluing, you will find the following aspects:
- If you want to glue vinyl flooring on a wet surface, this requires professional knowledge and experience. Especially with this type of vinyl installation, the subfloor must be very well prepared. Floating floors have a clear advantage in this respect. In addition to evenness and strength, a levelled subfloor is also necessary for vinyl adhesion. Depending on the necessary preparatory work, this effort can vary.
- It is also important to know that you can only remove glued vinyl planks by destroying them. Here you will definitely need a decent amount of force. To do this, you can hire machines such as strippers to help. After that, preparing the subfloor again is an issue, depending on the new flooring. Although these follow-up costs are only incurred at the end of use, they should be taken into account.
2. The alternative: sticking vinyl to insulation silent stick
The previous explanations refer to the classic way of gluing vinyl. This means gluing into the wet bed on a trowelled substrate.
For many applications, there is an alternative option: Sticking vinyl to the insulation silent stick. This includes new buildings, of course. But this alternative way of sticking vinyl is also particularly suitable for renovations in old buildings, on commercial premises and large properties. Especially when it is very time-consuming to remove firmly bonded old coverings such as PVC, linoleum, parquet or stone. This is when the silent stick adhesive insulation plays its trump card, because it allows you to cover old coverings with adhesive vinyl very quickly and cheaply.
It is very easy to dry-adhere vinyl in this way: First roll out the silent stick self-adhesive underlay. It already contains the dry adhesive on the top side. Then you stick the so-called dryback vinyl plank onto it. Always peel off the protective film on the insulation in the working width. Then, comparatively speaking, you simply lay the vinyl planks on top of the adhesive layer. You can still correct it here for a while. Sticking a vinyl floor onto the insulation silent stick decouples the floor structure from the subfloor and is therefore considered a floating installation.
The most important advantages of dry bonding vinyl planks to insulation silent stick:
- Sticking vinyl to insulation silent stick is ideal if you have a difficult subfloor that is not easy to trowel over. This includes, for example, an old linoleum floor or a PVC floor that is firmly glued down.
- Working with silent stick insulation therefore also means saving an enormous amount of time. Because preparing the substrate takes a lot of time. This will get the job done faster than the using the classical way.
- Customers find it particularly helpful that the vinyl floor can be used immediately after installation. Especially when many trades have to interlock during construction or repair, this provides security. Because nothing slips anymore.
- By the way, with bonding to silent stick insulation you achieve a similarly low build-up height as with classic bonding! The total build-up is between 3.8 and 4.3 mm. At first glance, the classic bonding method scores with an even lower build-up height - however, this usually involves filling the substrate. Thus, both bonding methods achieve the small increase of ~ 4-5 mm.
- A self-adhesive variant such as silent stick also has the benefit of being comparatively easy to install: you can easily correct incorrectly laid vinyl planks for half an hour.
- Gluing vinyl to insulation has the same advantage as the common floating installation. You can easily remove the floor again. This is because it is not firmly attached to the subfloor. This is an important factor, especially for temporary use. For example, this type of installation is ideal for tenants who are moving into rooms for a certain period of time.
- Since you have to lay around fixed facilities, you save some material. At the same time, there is no need to dismantle the furnishings if you only want to change the floor.
Are there any disadvantages to sticking vinyl on insulation silent stick?
- For some, an interruption in the flooring may seem like a disadvantage: because, as with click vinyl, you need to keep your distance from fixed fixtures such as a kitchen or heavy objects when using this type of floating installation. So place vinyl on insulation around the permanently installed kitchen.
- Even on large areas, you should install expansion joints at sufficient intervals. This is less visually appealing for large contiguous areas than if you can lay the flooring virtually indefinitely.
- For very high point loads such as a heavy piano, you must ensure load distribution under the feet.
3. installing self-adhesive vinyl - it couldn't be easier
Anyone who wants to install self-adhesive vinyl flooring is usually aiming for simple installation. This is because the planks are a ready-to-glue product. All you need is a suitable subfloor.
The advantages of self-adhesive vinyl flooring
Self-adhesive vinyl flooring has its advantages. These reasons definitely speak for self-adhesive vinyl flooring:
- There's no easier way to install vinyl flooring. That's because self-adhesive vinyl planks are factory-prepared to adhere directly to smooth, flat surfaces. Even if you're installing vinyl flooring for the first time, it's almost as easy as sticking on a sticker.
- You do not need to apply a separate adhesive with self-adhesive vinyl flooring. This saves your money, time and experience when gluing vinyl. So self-adhesive vinyl flooring is easy and safe to use, even without specialist knowledge.
- With a thickness of 2mm, self-adhesive vinyl flooring is one of the flattest floor coverings. This makes every self-adhesive vinyl plank the ideal renovation floor for the living area. Especially when the installation height of the flooring is crucial for glass doors.
- Self-adhesive vinyl flooring is easy to replace. If a vinyl plank is damaged or scratched, you can pick up each one individually. Warmed up with a hairdryer, it is easier to remove and a replacement plank made from the installation remnants can take its place again.
The disadvantages of self-adhesive vinyl flooring
Please also consider the disadvantages of self-adhesive vinyl flooring. Before deciding on whether to use self-adhesive vinyl, the negative side effects should be taken into account.
- The adhesive strength of self-adhesive vinyl flooring is limited. This is most often reflected in the fact that planks come off again, whether completely or only partially. The adhesive applied to the back may lose its adhesive strength over a period of time. But temperatures also affect self-adhesive vinyl. For as soon as the sun shines on self-adhesive vinyl, for example, not only does the thin covering soften quickly. The adhesive forces also weaken when heat is applied. Therefore, it is also possible to reheat the planks with a hair dryer and remove them.
- Vinyl flooring tends to shrink over time. The causes for this vary. The migration of plasticisers is just as much a part of it as the use of too aggressive cleaners. Self-adhesive vinyl flooring also shrinks more or less by itself. This is why the dimensions of the planks change. With self-adhesive vinyl flooring, visible joints form in such a case, which can be seen from an upright position. The dry adhesive cannot stop these forces.
- Because self-adhesive vinyl flooring is extremely thin (max. 2mm), every little unevenness in the floor covering shows through. A grain of sand results in a bump on the vinyl surface, a typical trowel stroke from troweling results a wave-like unevenness and every indentation results in a pressure mark. Visually, this can quickly be perceived as a defect. Especially in backlighting, glossy surfaces have a sensitive effect on a visual inspection.
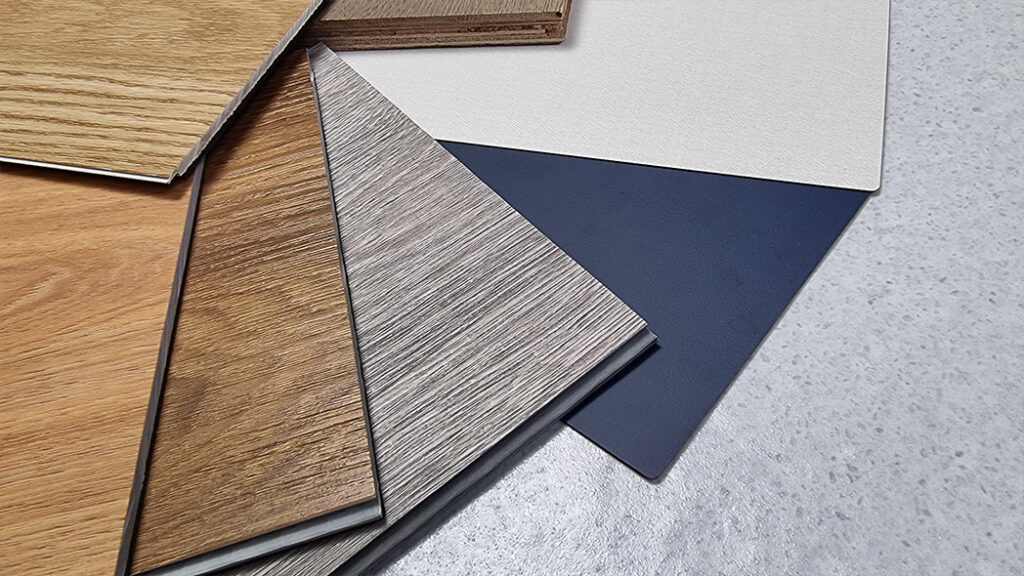
4. lay vinyl planks on a double-sided adhesive foil.
A special solution for vinyl floor adhesion is dry adhesion using a double-sided adhesive film, e.g. Sigan. In many cases, this is preceded by a special primer with Planus. Sigan is particularly suitable for applications where a design floor covering or vinyl floor is to be bonded in a removable way that can also withstand higher loads. The focus here is particularly on commercial rental spaces where everything has to be removed again without leaving any residue and the price does not play a decisive role.
You can benefit from these advantages with vinyl on adhesive sheeting:
- The entire floor structure is enormously flat. This is because only the thin adhesive foil is added to the vinyl thickness. Even classic gluing cannot undercut this.
- Sigan plays the trump card of installing vinyl on adhesive foil with the fact that the covering can be removed permanently without leaving any residue. This opens up many new application possibilities for which adhesive vinyl flooring would otherwise be out of the question.
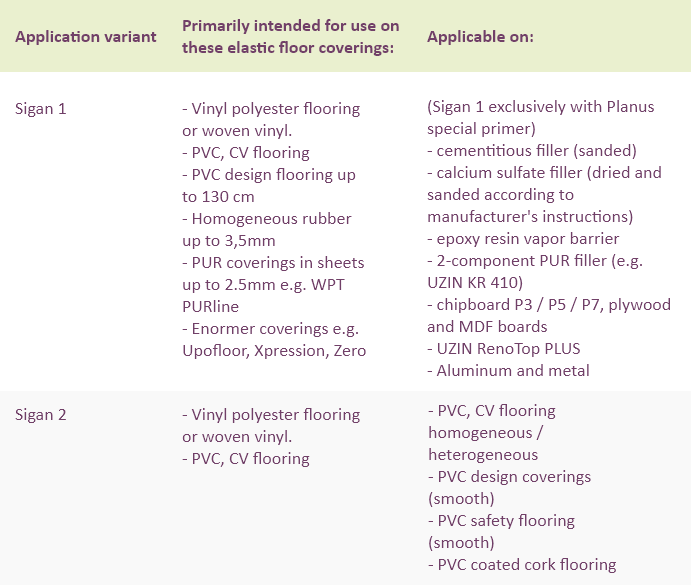
- The wide range of applications of vinyl to Sigan adhesive also comes from 2 Sigan variants for different substrates. This overview shows the different ways to use Sigan:
- Immediately after application, the floor structure is ready for maximum load. There are no waiting times. This saves time and provides safety for trades working in parallel. Because no damage can occur due to slipping materials.
- Vinyl on adhesive film Sigan allows virtually limitless laid surfaces without interruption, as long as the substrate allows it. Expansion joints are only necessary where they already exist in the substrate.
Also note the disadvantages of Sigan as an adhesive solution for vinyl flooring:
- Investing in Sigan only makes sense if the advantages are needed without alternative. Because this type of dry bonding is one of the more cost-intensive options.
- Anything that is not perfect on the subfloor will show up again when the floor is laid. Because the thin elastic structure does not forgive unevenness. They come visibly to the surface.
- Even if the installation is described as simple, it requires a bit of installation experience. This includes the professional assessment of the subfloor as well as the correct installation in two steps: first apply the foil without bubbles, then glue in the vinyl flooring.
When is gluing vinyl flooring more sensible than clicking?
You do not generalize the subject of vinyl click or glue here, that does not lead to your goal. In the end, it all depends on your personal preferences and the individual requirements. Therefore, clarify the following points:
- What are the technical conditions and requirements? The decisive factors are: subfloor, size and layout of the room, light and heat conditions and loads on the floor during use. Further questions are: Are there technical requirements for slip resistance, must the floor be antistatic or are chemicals used, as in sterilisation in the dental practice?
- Over what period of time is the space to be used? It can be very important to know that the room will only be rented for five years or for longer. If you need to restore the room to its original condition after a few years, it is better to stick with insulation. If, on the other hand, you are renting out the room for a very long period of time, then classic bonding is recommended.
- What are your price expectations? If the budget is very tight, you can save if you are a little flexible, for example in terms of design. Because even for commercial purposes, there are always heavily reduced special items. However, if you are planning and laying the floor in stages, then we advise you to choose a floor series that is also available in the range for a longer period of time.
- What is the visual effect of the floor on the surface? This is an interplay of the selected formats, colours and designs on the one hand and your object, for example the size and cut of the room as well as the design, furnishings and lighting, on the other.
- What care does the floor require? When choosing and planning, you should definitely take into account how you will use the floor. How can you clean it, maintain it and repair it if necessary. These are all costs that you may incur later.
As the choice of vinyl flooring depends very much on your ideas and the requirements of the property, we recommend that you seek advice when making your choice.
You are welcome to contact our expert advisors directly: Tel. +495222 960480 or by e-mail: info@planeo.de
The most common mistakes when gluing vinyl flooring
Glued vinyl flooring has many convincing advantages, especially in the commercial sector. However, there are also a number of pitfalls that you should be aware of. On the one hand, these are generally due to the installation of the vinyl, on the other hand, some mistakes occur specifically in the commercial sector.
Our basic advice is: Installing vinyl flooring requires expertise[1] . This applies above all to the two points of consultation and time. Too often, the individual parties in the construction do not communicate with each other, resulting in damage to the floor that could have been avoided. And too often work is done too quickly or too slowly. Both can lead to damage to the floor. Therefore, work thoroughly and precisely. It pays off.
- Substrate: The most common mistakes occur with the substrate. You should know the substrate well, check it and make decisions based on it. For example, the issue of moisture: It is important to measure and record the residual moisture of the subfloor. Vinyl is not a diffusion-open floor - unlike carpet, for example. This means that if the residual moisture in the subfloor is too high, the moisture will collect under the vinyl. Since the moisture cannot diffuse through the vinyl, the floor will dent in these areas.
- Follow the instructions, and contact the manufacturer if necessary: In the case of special challenges such as a planned floor structure that is not described in the installation instructions, we recommend asking. Check with the manufacturer whether the planned installation is possible.
- Materials: Only combine materials that are compatible with each other. Too often, installers use materials that are not ideally matched due to cost or ignorance. If you use any adhesive with any filler, the adhesive may not stick properly. In the worst case, joints will form or the floor will peel off.
- Expansion joints: Too often, no attention is paid to expansion joints in the subfloor. Expansion joints give the screed or subfloor the opportunity to react to movement of the building components and temperature fluctuations. The top covering, the vinyl flooring, must be able to cover these. If you do not take this into account, this can result in the formation of joints, warping or corrugation. The result: the floor is damaged.
- Processing times: A common mistake is that the specified times are not observed during processing. Often the adhesive is left open too long. The result: the adhesive forms a skin and no longer sticks properly. Then the planks may not hold and hollow spots form.
- Underfloor heating: Sometimes the vinyl floor is already installed although the underfloor heating has not yet been set. During the heating phase, underfloor heating is set to maximum power so that the screed stretches and thus loses tension. If the floor was installed during or before the heating phase, this will have a negative effect on the floor: If the vinyl floor is heated above the maximum surface temperature of 28°C, it will expand excessively and the planks will curl! Therefore, it is vital that the heating contractor and the floor installer communicate with each other. In addition, we recommend that you always look at the heating logs.
- Acclimatise: Give the vinyl floor time to acclimatise to the room temperature. The flooring should be in the room for at least 48 hours before you install it. A common scenario: The floor is delivered at 10 degrees outside temperature and then installed directly in the much warmer object. This always causes problems. If the floor was too cold when it was applied, it will expand over time. If the adhesive is now exposed to these tensile forces before it has even set, the planks can tear off.
Another typical mistake that occurs especially in the contract sector: the floor is brought into the room to acclimatise, but remains packed on the pallet. Then, under certain circumstances, only the edge areas heat up, while the vinyl planks remain cold on the inside. We therefore strongly recommend removing the floor from the pallet for acclimatisation and spreading it around the room.
Please feel free to leave your questions or comments here. We will answer you shortly.
Gluing vinyl flooring: Important questions summarised
Gluing vinyl flooring - All options at a glance
The classic way to glue vinyl flooring is to lay adhesive vinyl over the entire surface in the wet bed. To do this, apply vinyl adhesive with a notched trowel to the prepared, smoothly filled subfloor and glue in the vinyl planks.
Laying self-adhesive vinyl flooring is one of the easiest methods of gluing vinyl. Since the planks already have a dry adhesive on the back, they adhere to the subfloor by themselves, so to speak.
A good alternative to adhesive is the special impact sound insulation planeo silent stick with integrated dry adhesive. Dry gluing vinyl makes floating installation of adhesive vinyl possible. This means that the floor covering is not firmly bonded to the subfloor. As with click vinyl, no additional adhesive is required and you can install adhesive vinyl quickly and in a clean manner.
Advantages of planeo silent stick when laying adhesive vinyl
The patented insulation mat planeo silent stick offers you the following advantages for the installation of adhesive vinyl:
- Floating installation without additional adhesive
- Fast and clean processing
- Made from natural, renewable raw materials
- Plasticiser-free with "Blue Angel" certification
- High-quality walking and impact sound system
- Suitable for underfloor heating
- Minimal substrate preparation
- Can be laid on existing floor coverings
- Makes initial corrections possible
- Immediate walkability
- Can be removed without residue
- Handy roll material
- Time & and cost saving
Can I stick vinyl over underfloor heating?
Yes, because of good heat conduction, adhesive vinyl is an ideal floor covering for installation over underfloor heating.
An overview of the most common mistakes when laying adhesive vinyl:
- The subfloor was not thoroughly checked before installation. If there is a high level of residual moisture in the subfloor, the moisture will accumulate under the vinyl and bumps will become visible.
- The installation instructions were not followed exactly, special measures were not discussed with the respective manufacturer. We always recommend reading and following the manufacturer's instructions before installation. For specific questions and concerns, do not hesitate to contact the manufacturer directly. We are also happy to advise you on the products in the shop. Contact us: 05222 960 480 or info@planeo.de
- The materials used were not matched to each other. If, for example, the adhesive and filler do not match, it is possible that the adhesive will not hold properly. In the worst case, joints will form or the floor will peel off.
- Not observing expansion joints. This can lead to jointing, warping or corrugation and damage the floor.
- Processing times were not adhered to. For example, if the adhesive remains open for too long, a skin forms on it and it then no longer holds well. As a result, the vinyl planks do not hold properly and hollow spots are created.
- The underfloor heating has not been adjusted correctly. If an underfloor heating system is set to maximum power during the heating phase, the screed expands and loses tension. If the vinyl floor has warmed up above the maximum surface temperature of +28°C, it expands extremely, causing the planks to corrugate.
- The floor has not had enough time to acclimatise. In order for a vinyl floor to acclimatise to the room temperature, it must be in the room for at least 48 hours before installation. It is important to take it off the pallet and spread it around the room. This way you ensure that not only the edge areas warm up. If the vinyl planks remain cold inside, the floor will then expand over time.